There are various methods to remove rust from metal. Most of them are Industrial procedures which involve chemical cleansing or sand blasting. Not all metals can be chemically treated like the ancient/ vintage ones as their composition is unknown. Shot/ sand blasting leaves a rough surface finish and cannot be used on thinner metals as it will deform it. It may also remove the actual metal along with the rust. For domestic usage, the most feasible method is to use either vinegar or Electrolysis.
Process with vinegar involves, treating the rusted metal piece with white vinegar. A continuous bath of rusted metal in vinegar, loosens the rust off the work-piece. Usually this process is time consuming. It may take a minimum of 24 hours and even more. Also, white vinegar is quite expensive. Larger the metal, more volume of vinegar is required.
Removing rust with Electrolysis involves treating the metal piece in an electrolytic solution for a short period of time. This requires any DC power source and a small quantity of washing soda. This works only for metals with Iron composition which are known as Ferrous Metals. All the practical aspects will be discussed below.
I have written this article for non engineers. If I use some chemical language here, it would probably be the bare knowledge you should have.
Things Needed
Rusted Metal
Of course! Like I said above, not all metals are the same. Non-ferrous like Aluminum, Copper, Brass won’t work. Anything made of steel will work.
Plastic Tub
It’s a container to conduct Electrolysis. Size is your choice. It’s size must be such that the rusted metal should be completely immersed in the solution. The container must be able to accommodate the sacrificial metal without contacting the rusty metal.
The container need not be plastic. You can even use Ceramic, Glass or anything which is not conductive (which won’t transfer electricity). There are legends who have used bathtubs for this. And there are ultra legends who have used the whole swimming pool for this with an arc welder.
Never use a closed container. Gases are generated in this process which must be released immediately to the environment. Accumulation of gases is dangerous as they are Flammable.
Sacrificial Metal
As the name indicates, it is actually not sacrificial. Well, I mean, it won’t dissolve in the solution. What happens is, the rust actually gets adhered to this piece. Once the Electrolysis completes, you clean it and use it for your next Electrolysis experiment. You can use a wire brush for that.
Now if you use wire brush, you know wire brush works better with flat surfaces. So, get a Flat Mild Steel Plate of thickness about 3-4mm. Use it. Store it. Re-use it.
The main reason to use flat sacrificial metal is that it has more surface area. This makes the Electrolysis process faster.
Don’t use Stainless Steel (SS) or Galvanized Steel (GI). Chromium and Zinc are very harmful to health.
Electrolyte
You can use anything which makes the solution conductive. Table Salt (Sodium Chloride) does the job. But I don’t recommend it as it creates chlorine residue on the electrodes. The tried and tested electrolyte is Washing Soda (Sodium Carbonate). It is available in every market. It is not expensive and conducts clean Electrolysis. So, stick to washing soda only.
You will find Sodium Carbonate Powder in any Provision Store. It is the same powder used to do Laundry Wash in India.
Cables and Connectors
Get some cables of appropriate length and thickness. Thickness I would suggest is at least 1.5 sq.mm. Make sure the connections are firm. Loose connection between the wire and power source will develop heat and sparks. You should get some pairs of Alligator clips or Battery clips. Also, have some Nut & Bolts. The fact is, whatever you have, you can still get the job done. There may be some trial and error in the beginning.
Choosing a Power Source for Electrolysis
Here you need to choose wisely. I have tried almost all types of power supplies in my previous experiments. Now, you may take advantage of that.
AC vs DC: I have tried AC. Wait wait!. Not the 230V. I am talking about 12 and 24 volt floating AC output from Transformers. With and without neutral connections. It is possible to conduct Electrolysis, but it’s not efficient. So, DC is the only option left.
DC supply: As per my experiments, lower voltages like the 3 & 5 volts initiate the process, but they don’t conduct the reaction fast. Higher the voltage, faster is the reaction if sufficient current is supplied. I have chosen 12 volts as it is widely available. Even 19V laptop adapters work. Most of the laptop adapters are rated for 3.6 amps ( 65watts). At some point you may realize, current output would not be sufficient for our purpose.
Below I have discussed widely available 12 volt DC power sources in detail.
Generic 12 Volt Adapters
Yes. They are the cheapest ones out there. Their Current output will be 1.5A, 2A, 3A or maximum 5A. As the amp rating increases, price also increases.
I personally don’t recommend these to anyone as they get more and more expensive for higher ratings. They are not reliable. Moreover they have a thin cable to work which tends to break most of the time. So for the price of a 12volt 5amp adapter, you can build your own 12 volt power supply from a PC SMPS. It’s even cheaper if you buy a new one specifically for this purpose. This is discussed below.
PC SMPS Power Supply
This is the best and reliable DC power source. This is not directly available. You have to build your own setup. Like I said above, this is not expensive for a DIYer to build it. Moreover, here you have separate output of 3.3 and 5 volts along with 12 volts. You can use 3.3 volts for LEDs and 5 volts for Phone charging too. So this would be a multipurpose build.
Car Battery Charger
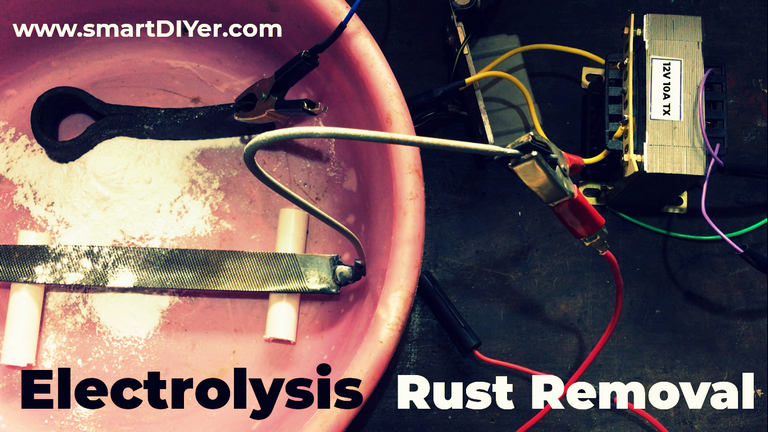
There are 2 types. One Transformer based and the other SMPS based. Both are similarly priced. I prefer transformer based ones as they have simple construction. Here too you can build DIY setup. Get a 12v/24 volt 10 amp Transformer and pair it with a single Phase Motorcycle Regulator. This can be used for both Battery Charging and for Electrolysis. (The featured image at the top has this setup)
Battery
Well, this is the best option ever. Why? Because you get full amp output This means, if a battery is rated at 12v 30amps, it can deliver even more than 30 amps. All the above mentioned sources have limitations in current output. The only drawback here is, you need to recharge it. Again you need some kind of power source. However, you can use Automotive batteries directly with the vehicle at idling position. This is not efficient as it is a waste of fuel and energy. Well, it’s all up to you.
Overall, I would suggest PC SMPS because it is cost effective and pumps out current up to 10 amps. This solely depends on the SMPS model. If the SMPS has a label mentioning 15A at 12 volt, it’s not true. Most manufacturers won’t mention its efficiency. While modifying the SMPS as Desktop power supply, remember to connect at least 6 of the yellow wires inside. If you use one or two, then it will melt them as wires are rated on amps and 10A output will exceed its limitations. If you want to build your own Power Supply from a PC SMPS, please check the video below. The other reason why I suggest PC SMPS is mentioned in the Safety section of this article.
Electrolysis Rust Removal Setup
Before you even start just remember, never ever let the electrodes make contact with each other. That means, the Positive and Negative output from the power source should not make direct contact. This will create sparks and may blow up the power source forever.

Step 1
Using a file or Angle Grinder, remove a small amount of rust just to expose the actual metal. Later you will connect the battery clip here, so that the current will flow into the metal.
Step 2
Place or suspend the rusty metal in a plastic container. Place the sacrificial metal beside it. It should not make contact. You can use multiple sacrificial plates as long as they are connected to the same power source.
Step 3
Disconnect the Power Source from the mains. Use a single power source only. Since current flows from Negative to Positive, we need to connect the Negative terminal of the power source to the rusty metal piece. So during the reaction, rust particles move from rusty metal towards the sacrificial plate.
Now connect the Positive of the power supply to the sacrificial metal piece. If you dip the connector in the solution, rust will first adhere to the clip rather than to the metal plate. So, suspend a piece of metal outside the container so that the connector can be used externally. If you can’t find anything to connect to the metal plate, get a 6013 welding electrode from the local market. Connect it to your plate using some kind of Nut and Bolt. Make sure, the connection is strong. Advantage of using welding electrodes is that they are flexible and you have the freedom to increase its length just by connecting one more to the end of the first one with just a plier.
Step 4
Once everything is connected, verify none of the electrodes are in direct contact and Power Source is unplugged or disconnected.
Step 5
Now we need to prepare the Electrolytic solution. Here you have two options. You can either make premixed solution prior to pouring it in the container or you can directly mix in the container itself. Wait! I am not telling to stir inside the container. The moment you pour water by force on the Washing Soda Powder, it will automatically get dissolved.
My mixing ratio is 1 Tablespoon for 2 litres of water. Never use huge quantities of washing soda for this purpose. Doing so won’t fast forward the reaction. It will make the water more conductive which is not good as it creates a short circuit between the electrodes.
If your SMPS based power supply is not working, it means you have used too much of washing soda.
Washing Soda is also known as Sodium Carbonate. It is the one used in Laundries for power wash. Baking Soda is different. It’s Sodium Bicarbonate.
Step 6
Now, as soon as you switch ON the power supply, bubbles start generating in the solution. If it doesn’t, that means reaction has not started and there might be something for you to fix.
99% of the cases, it will be the issue with the negative terminal not connected to the rusted metal. Use a file and make a better connection.
Solution gets muddier and muddier during the process. After about one hour (depends on your power supply and size of workpiece) switch OFF the power supply first before you move anything inside the container. Check the condition of the rusted metal. Sometimes, the condition of rusted metal may still look dirty. So use some soap to clean it. Most of the rust will come off. If not, continue the reaction.
If the solution gets too dirty, replace the water. Now at this point you may find yourself that if you use a drainable container it would be easier for you to replace the water.
And this is how the process works. Please read the note below for some important information.
Note
1. Only ferrous metals can be treated. Sacrificial metal should also be ferrous. Non ferrous metals like aluminum will dissolve in the electrolytic solution.
2. Higher the amps, faster the reaction. Never use higher voltages.
3. Rust particles move from negative to positive. Reversing the polarity will have an reverse effect.
4. As the distance from the rusted metal and sacrificial metal increases, time consumed also increases. The closer you keep it, faster the reaction will be. When both the metals are closer, it will draw more amps from the power source, fast forwarding the reaction.
Safety
It is always safe if the Power Source is equipped with a ground pin. If there are issues in the power lines, or if Neutral of your domestic supply is carrying some voltage, there is a 100% chance that, if you touch the electrolytic solution, you will experience electric kiss. If there is no ground pin, or if it is not connected to the body of your power source, it is not at all safe.
Ground Pins are present in all PC SMPS. Most of the transformer based Car Battery chargers have it. If it doesn’t have, you can install it just by connecting the transformer body to the ground pin of your Domestic Socket.
Regarding the short circuit protection, PC SMPS based power supply has built in safety feature which automatically shuts off if positive and negative terminals are in direct contact. Transformer bases battery chargers may not have that safety feature built in. This may blow up the rectifier circuit if in case of short circuit.
Conduct Electrolysis in open area. Never use a closed container. Hydrogen gas is liberated in this process. It is flammable. So, never work near places which can ignite it.
Don’t use higher DC Voltages. Higher DC Voltages are more dangerous than AC voltages. This can cause fatal accidents. Always remember, it is the voltage that kills, not the current. A 220VAC is safer than 220VDC. AC has frequency, you can easily cut off your body contact from it. In DC it may not be possible for you to do so because DC won’t let go.
If you find this article unique and if you learnt something, let me know in the comments. Below is a video, where I have demonstrated Electrolysis by de-rusting a 40 year old door latch. The video is short. It might be worth watching. Remember to read the description.